Quick read: A/B amp switching is different from parallel amp routing. Parallel runs both amps at once and blends them. A/B switching runs one amp at a time and toggles between them — the verse on a clean Fender Twin, the chorus on a cranked Marshall, with one footswitch press in between. On the Line 6 Helix, this is built with snapshots — two snapshots in the same preset, each with a different amp block enabled. On the Neural DSP Quad Cortex, it is built with scenes — two scenes in the same preset, each routing to a different amp block. The transition is gapless on both platforms. The volume needs to be balanced manually.
| Platform | Mechanism | Footswitch Footprint | Transition | Notes |
|---|---|---|---|---|
| Line 6 Helix | Snapshots | 1 footswitch in Snapshot mode | Gapless | Up to 8 snapshots per preset |
| Neural DSP Quad Cortex | Scenes | 1 footswitch in Scene mode | Gapless | Up to 8 scenes per preset |
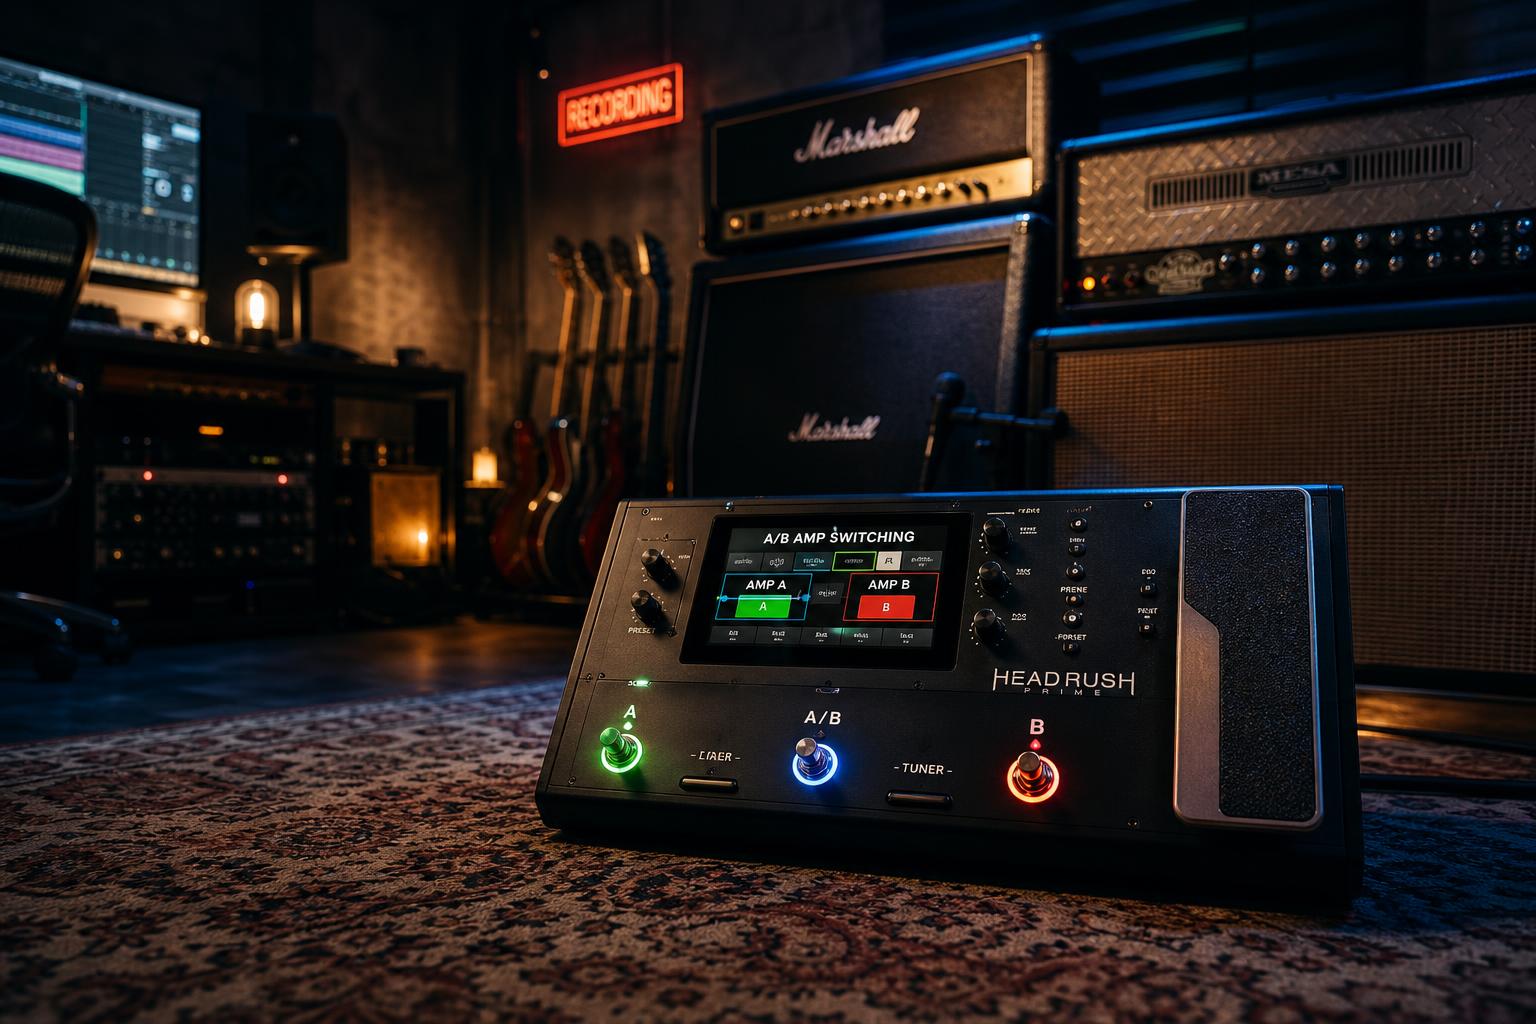
| Headrush MX5 / Prime | Patches | 1 footswitch (patch step) | ~10ms gap | Patch transition has audible gap |
| Boss GT-1000 | Patch select | 1 footswitch | Gapless (within bank) | More menu-diving than Helix or QC |
Why A/B Switching Is Not the Same as Parallel Routing
This is one of the most useful modeler tricks that most players set up wrong. The two architectures are often confused because they both involve two amps in one preset. The difference matters because the use cases are different.
A parallel rig runs both amps at the same time. The signal splits at the input, hits both amps simultaneously, and the two amp outputs sum at the mixer block. This is what the parallel amp routing post covers in detail — it is the architecture you use when you want a single tone that combines two amp characters, like a clean Fender for low-end body and a dirty Marshall for midrange grit.
A/B switching runs one amp at a time. The signal hits the first amp during the verse, the player steps on the footswitch, and the signal now hits the second amp for the chorus. Only one amp is producing sound at any given moment. This is the architecture you use when you want a clean tone for the verse and a dirty tone for the chorus, and you want them to be distinctly different rather than blended.
The verse-chorus transition is the most common reason to set up A/B switching. Clean verse, driven chorus, one footswitch, no volume jump. Worship players, modern rock players, and indie players all use this architecture for the same reason: tonal contrast that a single channel-switching amp can't produce.
The other reason to set up A/B switching: songs where two tones need to alternate without a volume jump. A parallel rig can do this but requires careful EQ matching to prevent the tones from sounding muddy when summed. A/B switching avoids the summing problem entirely because only one amp is running at a time.
Helix Setup: Snapshots in One Preset
Snapshots are the Helix mechanism for A/B switching. A snapshot stores the on/off state of every block in the preset and the value of any parameter you have assigned to snapshot control. The block routing stays the same — only the on/off states and the parameter values change. The transition between snapshots is gapless: there is no audio dropout, no click, no DSP reload.
The build:
- Start with an empty preset. Path 1A only. Add an Amp+Cab block, a reverb block, and any other effects you want.
- Place a second Amp+Cab block in series with the first. Both amp blocks are in the same signal chain, both pointing to the output. The signal will pass through both at once if both are enabled.
- In Snapshot 1, disable Amp 2. Only Amp 1 is producing sound. Set Amp 1 to your verse tone — Twin Reverb, US Princeton, AC30 Top Boost, whatever is the clean voice for the song.
- In Snapshot 2, disable Amp 1 and enable Amp 2. Only Amp 2 is producing sound now. Set Amp 2 to your chorus tone — Brit 800, JCM Plexi, Cali Texas Ch 2, whatever is the dirty voice.
- Assign one footswitch to toggle between Snapshot 1 and Snapshot 2. In the Command Center, set a footswitch to "Snapshot Up" or assign it to a specific snapshot.
The volume balance happens at the amp block. The clean amp is going to be quieter than the dirty amp at equivalent settings, because the dirty amp is producing more saturation and more apparent loudness for the same channel volume. To match the perceived levels:
- Set the dirty amp's Channel Volume to about 5.0
- Set the clean amp's Channel Volume to about 7.5-8.0
- Play through both snapshots and listen for the level match
Use your ears, not a meter. Perceived loudness in distorted vs. clean tones is not what an SPL meter measures — distorted signal has higher RMS for the same peak level, which means the meter will read the dirty amp as louder even when the clean amp is perceived as louder by the listener.
Quad Cortex Setup: Scenes in One Preset
Scenes are the Quad Cortex equivalent of snapshots, with one important difference: a scene can route the signal to a different block path entirely. The Quad Cortex's grid layout supports parallel signal paths, and a scene can switch which path is active. This makes A/B switching more flexible on the QC than on the Helix because the two amps do not have to be in series — they can be in parallel paths, with the scene determining which path is fed to the output.
The build:
- Start with an empty preset. Use the grid view, not the linear view.
- Place Amp 1 in Row A (the top row of the grid) and Amp 2 in Row B (the second row). Both amps receive the input signal in parallel.
- Place a Mix block at the end of Rows A and B that sums them to the output.
- In Scene 1, set Row B's amp to bypassed (or set the Mix block's Row B level to -inf dB). Only Amp 1 is producing sound.
- In Scene 2, set Row A's amp to bypassed (or set the Mix block's Row A level to -inf dB). Only Amp 2 is producing sound.
- Assign one footswitch to scene-cycle between Scene 1 and Scene 2.
The Quad Cortex Mix block approach is more reliable than bypassing the amps directly, because bypassing an amp block triggers a brief DSP recalculation that can produce a small audible glitch on some firmware versions. Routing through a Mix block with the level set to -inf dB is silent and gapless.
Volume balance works the same way on the QC. The dirty amp's Master Volume should be lower than the clean amp's Master Volume by 30-40% to compensate for the perceived loudness difference. Use the QC's built-in level meter to get into the ballpark, then trust your ears for the final match.
The Volume Match Problem
The single most common failure mode of A/B amp switching is a volume jump on the transition. The verse plays at one volume, the chorus jumps up by 4-6 dB, and the dynamic intent of the song is destroyed because the chorus is now too loud relative to the rest of the band. The second most common mistake is using parallel routing when you meant A/B; if both amps are running simultaneously, you get a blended tone instead of a clean switch, and the volume interaction between the two amp blocks becomes unpredictable.
The reason this happens: distortion compresses peaks. A clean amp at the same channel volume as a distorted amp will have higher peak levels but lower RMS. The clean amp's peaks hit the output limiter or the converter ceiling at a lower channel volume setting; the distorted amp's RMS-heavy signal sounds louder at the same peak level. If you balance the two amps by peak level, the dirty amp will be perceived as louder.
The fix is to balance by perceived loudness, not peak level. The procedure:
- Play a representative chorus passage on Amp 2 — full chord, full strumming attack
- Switch to Snapshot 1 / Scene 1 and play a representative verse passage on Amp 1 — same playing intensity, same chord shapes if possible
- Listen for the level difference. If the chorus jumps up, lower Amp 2's Channel Volume by 1.0 (Helix) or 2 dB (QC). If the verse jumps down, raise Amp 1's Channel Volume by the same amount.
- Repeat until the transition is seamless — the chorus should feel bigger because of the tonal change, not louder
Worship players have a specific variant of this problem: the chorus is supposed to be both bigger and louder, but the volume jump should be controlled, not jarring. The solution is to set the volume match so the chorus is 1-2 dB louder than the verse at most. Anything more than 3 dB on a single footswitch press feels like a mistake to the listener even when it is intentional.
A Surprised-Discovery Moment
The expectation going into A/B switching is that the two amp tones need to be carefully matched in EQ as well as volume — that the chorus tone should sit in roughly the same frequency space as the verse so the transition feels coherent.
What testing across both platforms shows is the opposite. The transition feels more musical when the two amps are deliberately voiced for different frequency ranges. The clean amp can be voiced bright and shimmery (Treble at 7, Presence at 6, low-mid scooped slightly); the dirty amp can be voiced dark and midrange-forward (Treble at 4, Presence at 4, low-mid pushed up). The contrast between the two tones is what makes the transition feel like a tonal event rather than a volume event.
The mistake is voicing both amps to sound similar and relying on the gain difference alone to differentiate them. That makes the transition feel like a louder version of the same tone. The right approach is voicing them to sound different — different enough that the listener perceives the chorus as a new color, not just a louder version of the verse.
Helix Snapshot Tricks
Snapshots can change more than just block on/off states. Any parameter can be assigned to snapshot control by holding the encoder for that parameter and selecting "Assign to Snapshot." This unlocks several useful tricks:
- Different reverb mix per snapshot — clean verse with a long hall, dirty chorus with a short plate
- Different delay time per snapshot — verse with a slap-back, chorus with a dotted-eighth
- Different EQ per snapshot — clean verse with the bass at 6, dirty chorus with the bass at 4 to keep the low end tight under saturation
- Different output volume per snapshot — fine-tune the level match without touching the amp's Channel Volume
The Helix global settings let you choose whether snapshot transitions trigger smooth parameter changes or instantaneous changes. For verse-chorus switching, instantaneous is the right setting — the change should happen on the footswitch press, not gradually over 200ms.
Quad Cortex Scene Tricks
The Quad Cortex's scene system is more granular than Helix snapshots in one way: each block can be set to a different parameter value per scene with no extra assignment step. Just navigate to the parameter, change it, and the change is stored to the current scene automatically.
Useful scene-level changes for A/B amp switching:
- Different Master Volume per scene for the level match
- Different Mix block routing per scene for the amp selection
- Different EQ band gain per scene for tonal differentiation
- Different effect block on/off per scene — verse with a chorus pedal, chorus without
The QC's "Hybrid" mode (combining Snapshot and Scene behavior) is more capable than the Helix equivalent, but for straightforward A/B amp switching, Scenes are sufficient and easier to set up.
When to Use Three Amps Instead of Two
Some songs need more than two distinct tones — a clean verse, a slightly driven pre-chorus, and a fully cranked chorus, for example. Both platforms support up to 8 snapshots/scenes per preset, which is enough for any practical use case.
The build extends naturally:
- Snapshot 1 / Scene 1: Clean amp only
- Snapshot 2 / Scene 2: Clean amp + low-gain drive pedal
- Snapshot 3 / Scene 3: Dirty amp only
The volume match becomes more complex with three tones, but the principle is the same: balance by perceived loudness, not peak level, and voice each tone for a different frequency range so the transitions feel like tonal events.
For songs that need three or more distinct tones, the workflow is to dial in the loudest tone first (typically the chorus), then dial each lower-gain tone to match it. This ensures the loudest tone is at the right level for the band mix, and the quieter tones come up to meet it rather than the chorus tone needing to be turned down to match the verse.
What Other Modelers Do
The Helix and Quad Cortex are the most commonly referenced platforms because they have the cleanest snapshot/scene implementations. The other modeler families handle this differently:
- Headrush MX5 and Prime: A/B switching is done via patch changes, which have a small but audible gap (~10 ms) on the transition. This is acceptable for between-song changes but can be noticeable on a verse-chorus transition. A workaround is to use a single patch with parallel amp routing and a footswitch-controlled mixer level, but this has its own complexity.
- Boss GT-1000 / Core: Patches can be linked into banks for fast switching, and within a bank the transitions are gapless. Setup is more menu-driven than the Helix or QC, but the result is comparable.
- Fractal FM3 / FM9 / Axe-FX III: Scenes work essentially like Helix snapshots, with similar capabilities. The volume match procedure is identical.
- Kemper Profiler: Performance Mode can hold up to 5 rigs per performance with gapless switching between them. The setup is different from Helix/QC because the Kemper does not allow two amp blocks in one rig — each rig is one amp profile. A/B switching on Kemper is rig-to-rig, not block-to-block.
The principle is the same on every modeler: store two amp tones in switchable states, balance the volumes, and assign a footswitch. The implementation details vary.
Bottom Line
A/B amp switching is one of the most useful modeler techniques because it solves a problem analog rigs solve poorly. A two-channel tube amp can switch between clean and dirty, but the two channels share a single tone stack and a single power section, which limits how different they can be. Two amps switched via an A/B/Y pedal can have completely independent tones, but the rig is bulky, expensive, and requires manual volume matching at the amp.
A modeler with snapshots or scenes gives you two completely independent amp models, with independent EQ, independent effects, and gapless switching, controlled by a single footswitch. The setup takes 20 minutes. The result is a verse-chorus tonal change that no single-amp rig can produce.
For deeper coverage of when to choose A/B switching vs. parallel routing for a given song, see our parallel amp routing post. For the specific Helix snapshot mechanics in more detail, our Helix amp model cheat sheet covers which amp blocks pair well for verse-chorus contrast.