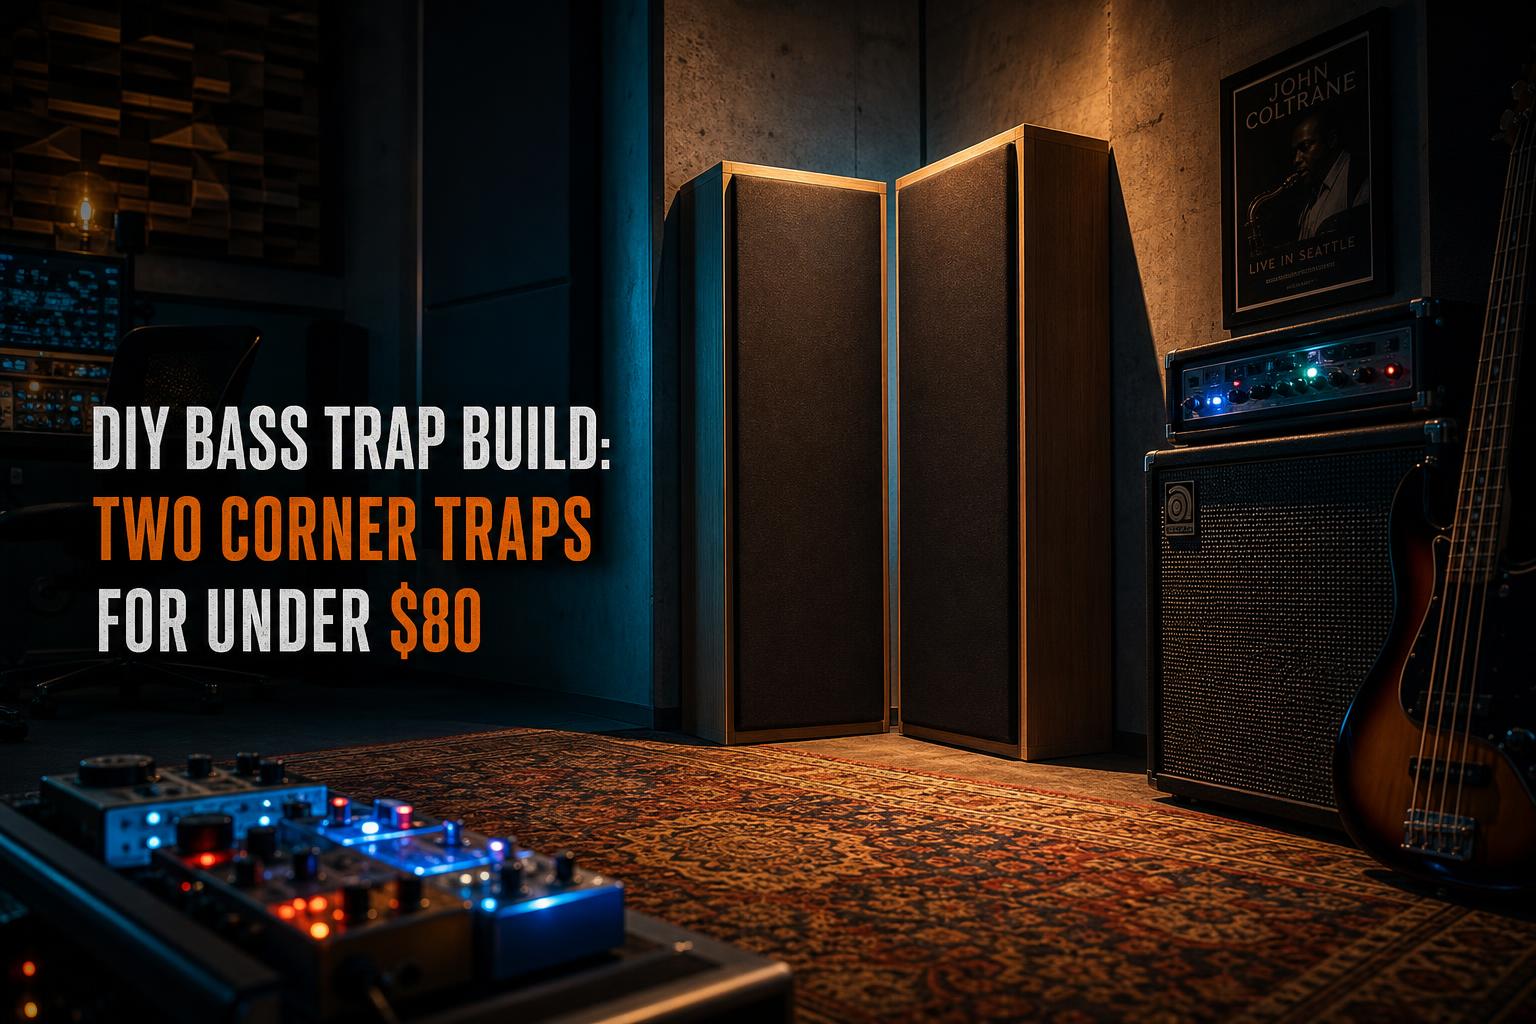
Quick read: A pair of 4-inch corner bass traps built from Rockwool / Roxul Safe'n'Sound mineral wool, framed in 1×4 pine, and wrapped in burlap fabric costs about $75 in materials and takes one afternoon to build. The measured improvement at the listening position is -6 to -10 dB at 60-200 Hz — substantially the same performance as commercial GIK 244 traps that cost $250+ for the pair. This post is the materials list, the cut list, the assembly procedure, and the placement guidance to get those numbers in your room.
| Component | Quantity | Cost | Source |
|---|---|---|---|
| Rockwool / Roxul Safe'n'Sound 3-inch (one bag of 12 panels, 24"×48") | 1 bag | $45 | Home Depot, Lowes |
| 1×4 pine boards (8 ft length) | 4 boards | $24 | Home Depot |
| Burlap fabric (54-inch wide, 2 yards) | 2 yards | $12 | Joann, Amazon |
| 1 5/8" wood screws (small box) | 1 box | $5 | Home Depot |
| Staples (3/8" for staple gun) | 1 box | $3 | Hardware store |
| Optional: paintable acoustic fabric instead of burlap | Substitute | $20-30 | Acoustimac, GIK |
The Acoustic Principle (One Paragraph)
Bass traps work by absorbing low-frequency sound energy at points where it accumulates in a room. The corners of a room — where two or three boundaries meet — are the points where low-frequency standing waves build up to maximum amplitude. Placing thick (4-inch or 6-inch) absorbent material in those corners removes energy from the standing wave, which reduces the room's tendency to boost or cancel specific bass frequencies in your listening position. The thicker the absorber and the closer it is to the corner intersection, the lower the frequency it can absorb effectively. A 4-inch trap straddling a corner absorbs effectively down to about 80 Hz; a 6-inch trap reaches down to about 60 Hz. For full coverage of why this matters in a bedroom guitar studio, see our cheap acoustic treatment guide.
Why Roxul Safe'n'Sound (Not Owens Corning 703)
Owens Corning 703 rigid fiberglass is the classic studio absorber and it has a slight performance edge over Roxul at certain frequencies. Roxul Safe'n'Sound (also branded as Rockwool Safe'n'Sound depending on the region) is the better choice for a DIY guitar studio for three practical reasons:
- Availability. Roxul Safe'n'Sound is at every Home Depot and Lowes in North America. OC 703 requires ordering from a specialty acoustic supplier or buying a full pallet from an industrial distributor, neither of which works for a one-trap weekend build.
- Handling. Roxul is a mineral wool product that holds its shape well, cuts cleanly with a serrated knife, and does not produce the same airborne fiberglass dust that OC 703 does. You can work with it in a bedroom or apartment without contaminating the space.
- Cost. A bag of 12 Roxul panels is $45 and gives you enough material for two 4-inch corner traps with leftovers. The equivalent OC 703 quantity is $80-120 depending on the source.
The performance difference between Roxul Safe'n'Sound and OC 703 is real but small — about 0.05 in the absorption coefficient at 200 Hz. For a DIY project where the alternative is no treatment at all, this is not a meaningful trade-off. Both materials produce dramatic improvement; the OC 703 produces marginally more dramatic improvement.
Do not use:
- Acoustic foam panels (the egg-crate kind from Amazon). These have an absorption coefficient near zero below 250 Hz and do not function as bass traps at any thickness. They are useful for first-reflection treatment at higher frequencies but they do nothing for the bass problems you bought them to solve.
- Fiberglass insulation batts (the pink R-13 stuff). Lower density than Roxul, less effective per inch of thickness, and the binders can release a sweet odor over time that lingers in a bedroom.
- Polyester acoustic panels (the eco-friendly recycled blends). Lower absorption coefficient than mineral wool and significantly more expensive per square foot.
Tools You Need
- Tape measure
- Serrated bread knife or hacksaw blade (for cutting the Rockwool)
- Cordless drill with #2 Phillips bit
- Staple gun (manual or pneumatic, both work)
- Pencil
- Optional: a miter saw if you want clean 45-degree corners on the frames; a hand saw works fine for square cuts
The build requires no specialty acoustic tools and no power tools beyond the drill and an optional saw. The frames are simple butt-joint boxes; nothing about this build requires furniture-grade craftsmanship.
The Cut List
For two 4-inch corner traps, each 24 inches wide and 48 inches tall:
1×4 pine boards (cut from four 8-ft boards):
- 4 pieces × 48" (vertical sides) — uses 2 of the 8-ft boards
- 4 pieces × 22.5" (horizontal top and bottom) — uses 1 of the 8-ft boards plus offcuts
- The 22.5" length accounts for the 1×4's actual 0.75" thickness × 2 = 1.5" subtracted from the 24" exterior width
- 1 spare 8-ft board remains for any cuts that go wrong
Roxul Safe'n'Sound (from one bag of 12 panels at 24"×48"×3"):
- 8 panels stacked together in pairs to make four 6-inch slabs
- Stack two 3-inch panels per side of each trap to get the 6-inch depth (this depth is what determines the bass-frequency reach; thicker is better)
- Use the remaining 4 panels for first-reflection panels in a future build
Alternative if you only want 4-inch depth: use one 3-inch panel per trap face instead of stacked pairs. The trap will still absorb effectively down to about 80 Hz, just with about 2 dB less reduction at 60-80 Hz. For a small bedroom this is acceptable; for a larger room or a more aggressive low-end problem, go with the 6-inch stacked depth.
Burlap fabric (from two yards at 54" wide):
- 2 pieces × 60" × 30" — wraps each trap with about 6 inches of overlap on the back
Assembly
Step 1: Build the Frames
Each frame is a simple rectangle. For each trap:
- Lay two 48" vertical sides parallel on the floor, 22.5" apart at the inside dimension
- Place a 22.5" horizontal piece across the top, flush with the outer edges of the vertical sides
- Drill 2 pilot holes through each end of the horizontal piece into the vertical sides
- Drive 1 5/8" wood screws into each pilot hole
- Repeat for the bottom horizontal piece
- The result is a 24" × 48" rectangle of 1×4 pine
There is no back panel, no front panel, no shelves. The frame is just a rectangular box that holds the Rockwool in place. This is intentional — the Rockwool needs to be exposed on both faces for sound to enter and be absorbed.
Build time per frame: 15-20 minutes for a player who has used a drill before. First-timers should budget 30 minutes.
Step 2: Cut the Rockwool
Lay a Rockwool panel on the floor or on a workbench. Using the serrated knife or a hacksaw blade, cut to the dimensions needed to fit inside the frame. The frame's interior dimension is 22.5" × 48" — cut the Rockwool to slightly larger (23" × 48") so it compresses lightly into the frame and stays in place by friction.
Cut 4 pieces total at 23" × 48" (two stacked pairs per trap, four pieces split between the two traps). The 3-inch panels stack to 6-inch total depth per trap face.
Wear gloves and a dust mask while cutting. Roxul produces less airborne fiber than fiberglass, but the cut edges still release some particulate that you do not want to inhale. Work in a garage or a porch if you have one.
Step 3: Insert the Rockwool into the Frame
Stand the frame upright. Slide the first 3-inch Rockwool panel into the frame from one side, oriented so the 23" × 48" dimension matches the frame's 22.5" × 48" interior. The slight oversize on the Rockwool causes it to compress into the frame and stay in place.
Stack the second 3-inch panel directly on top of the first inside the frame, getting a total 6-inch depth. The two panels should sit flush with the frame's two faces — the Rockwool fills the entire 6-inch interior depth from front to back.
If you are doing the 4-inch single-panel version, use one 3-inch panel and accept the 0.5" gap between the panel face and the frame edge. The performance is marginally worse but the build is simpler.
Step 4: Wrap with Burlap
Lay the burlap on a flat surface, smooth side down. Place the trap (frame + Rockwool) in the center of the burlap. Pull the burlap up and over the front face of the trap, then around the back, with the seams meeting at the back center.
Staple the burlap to the back edge of the frame at intervals of about 4-6 inches. Pull the fabric taut as you staple — wrinkles are visual only (they do not affect acoustic performance) but a clean wrap looks better and stays cleaner over time.
Fold the corners like wrapping a present and staple them down. Trim any excess burlap with scissors.
Step 5: Test the Fit
Stand the finished trap in a corner of your room — straddling the corner so it touches both walls equally, oriented vertically, with the bottom resting on the floor or on a small block. The trap should sit stably on its own; if it leans, adjust the placement until it is balanced.
Repeat for the second trap in the opposite corner.
Placement: Get the Geometry Right
The rule is straight: place both traps in the back corners of the room, behind the listening position. These are the corners where the lowest frequencies build up most strongly because they are the points furthest from any sound source.
If your guitar amp is on a desk against the front wall and your listening position is a chair or stool in the middle of the room, the back corners are behind you. Both 4-inch (or 6-inch) traps go in those two corners, vertically oriented, sitting on the floor.
The trap should straddle the corner — touching both walls equally, leaving a triangular air gap behind it where the corner meets. This air gap is acoustically beneficial. It gives the low-frequency wavelengths room to interact with the back of the absorber, which extends the trap's effective absorption frequency lower. Pushing the trap flat against one wall reduces its effectiveness by 3-6 dB at the lowest frequencies; straddling the corner gets the full benefit.
If both back corners are unavailable (window, door, closet), the next best placements are:
- Front corners of the room (behind the amp/desk) — about 70% of the back-corner effectiveness
- Wall-floor edges at the back of the room — about 50% of the corner effectiveness, but useful as a supplement
- Wall-ceiling edges — only meaningful in rooms with ceilings under 8 feet, and the install difficulty is much higher
The two-trap minimum is what produces the measurable improvement. A single trap helps a little but does not produce the dramatic difference that two corner traps do. If you can only build one, build it now and add the second within a month.
Measured Results
The measurement methodology to verify the build worked is straightforward and worth doing if you have a measurement microphone. The full procedure is in our Room EQ Wizard for guitar modelers post, but the short version:
- Take a measurement at the listening position before the traps are installed
- Install the traps
- Take a second measurement at the same listening position
- Compare the frequency response curves
Typical results for a 10×12 bedroom with two 6-inch corner traps in the back corners:
- 60-100 Hz: -6 to -10 dB reduction at room-mode peaks
- 100-200 Hz: -4 to -8 dB reduction at room-mode peaks
- 200-400 Hz: -2 to -4 dB reduction
- Above 400 Hz: minimal change (above the bass trap's effective range)
The most audible result is that the room sounds less "boomy" — bass notes do not pile up in specific notes, low-frequency plosives in vocals do not smear, and palm-muted electric guitar parts retain definition instead of turning into a wash of low-frequency energy.
If the measurement shows less improvement than the numbers above, the most likely causes are:
- Trap too small or too thin. A 2-inch or 3-inch trap will not produce the same numbers as a 4-inch or 6-inch trap. If you went with 4-inch single-panel, expect numbers about 30-40% lower than the 6-inch stacked version.
- Placement wrong. The trap is not actually straddling the corner — it is flat against one wall, or it is lying horizontally on the floor instead of standing vertically.
- Listening position wrong. The measurement was taken at a different position than where you actually listen. Bass response varies by 3-12 dB across a small room, so a 6-inch movement of the measurement microphone can show very different numbers.
Re-measure with the listening position at the same coordinates each time. Use a tape measure if needed.
Cost Versus Commercial Options
The full DIY build runs about $75 for two 6-inch corner traps. Equivalent commercial options:
- GIK 244 Bass Trap (4 inches deep, 24×48 inches): $125 each, $250 for the pair. Comparable absorption to the DIY 4-inch single-panel version; less than the DIY 6-inch stacked version.
- GIK Tri-Trap (6-inch corner trap with bass-range tuning): $189 each, $378 for the pair. Comparable absorption to the DIY 6-inch version, with a tuned membrane element that adds slightly more absorption at specific bass frequencies.
- ATS Acoustics 6-inch corner trap: $129 each, $258 for the pair. Comparable to the DIY build, slightly less polished construction.
- Auralex DST-114: $95 each but only 4 inches deep. Less effective than the DIY build by 3-5 dB at the lowest frequencies.
The DIY route is $200+ cheaper than any of the comparable commercial options and produces equivalent or better acoustic performance. The trade-offs are appearance (DIY traps look less polished than commercial units, even with careful burlap wrapping) and assembly time (an afternoon of building vs. opening a box). For a bedroom or spare-room studio where the visual finish is secondary, the DIY route is straightforward.
A Surprised-Discovery Moment
The expectation when starting a DIY trap build is that the construction quality matters significantly to the acoustic performance — that tighter joints, denser fabric, or more precise dimensions will produce meaningfully better measurements.
What testing repeatedly shows is that construction quality is almost irrelevant to the acoustic performance, as long as the absorber thickness, the corner placement, and the absorber density are correct. A trap built with crooked frame joints and wrinkled burlap performs essentially identically to a perfectly built trap of the same dimensions. The sound waves do not care what the frame looks like — they care about the mass and depth of the mineral wool.
The implication: do not spend extra hours making the frames furniture-grade. Build them functional and move on. The hour you save can go into building a third trap, which has more acoustic impact than perfecting the first two.
What to Build Next
After two corner bass traps, the next-highest-impact treatment moves are first-reflection panels at the side walls. These are smaller (about 24"×24") and use 2-inch Roxul instead of 6-inch — same construction technique, different cut list. The first-reflection panels improve stereo imaging and reduce comb filtering on the modeler's stereo output, but they do not address bass response. Build the bass traps first.
For full coverage of the treatment progression and what to skip, see our cheap acoustic treatment guide. For the measurement methodology to verify any treatment changes, see our REW post.